Elevate your video editing game with our guide on effortlessly animating subtitles in Adobe Premiere Pro 2023. In today’s visual storytelling era, captivating subtitles are key to audience engagement. In this guide, we’ll simplify the process, enabling beginners and pros alike to create dynamic subtitles that seamlessly enhance your video content. From animation styles to syncing text with audio, we’ll walk you through it all, empowering you to produce impressive, professional-grade subtitles. Let’s embark on your journey to subtitle animation mastery!
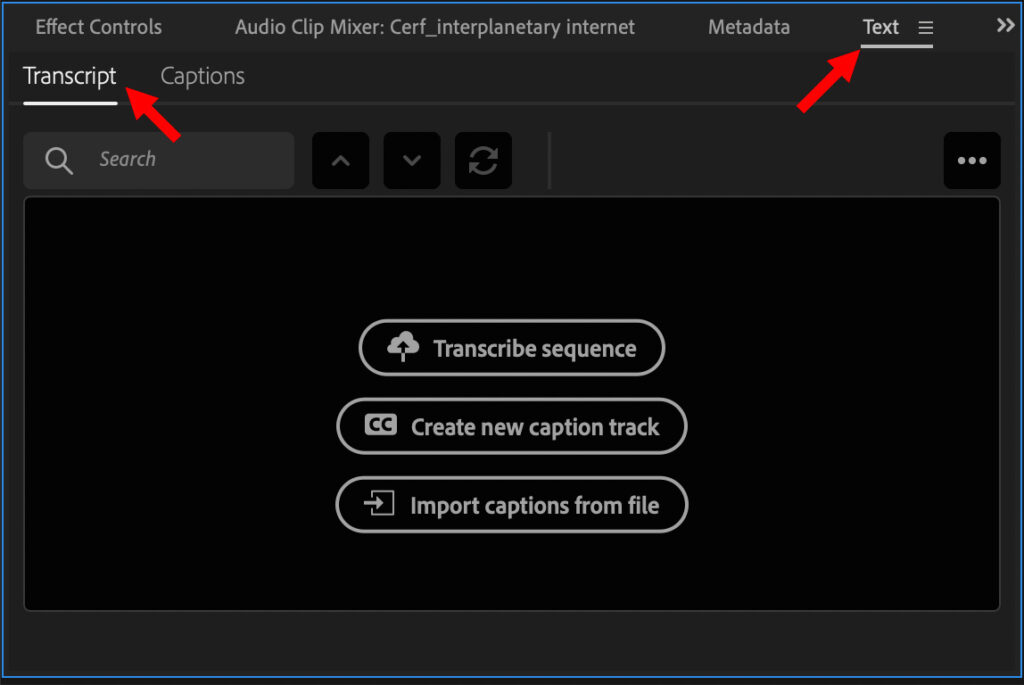
Transcribing Sequence
1. Prepare Your Video Timeline
- Begin by editing your video in the timeline until you’re ready to insert captions.
- Ensure that the In and Out points in your timeline cover the entire section where you want to add captions.
2. Access the Captions Tool
- Navigate to the “Window” menu and select “Text” to access the Captions tool.
3. Initiate Transcription
- In the Captions tool, locate the “Transcribe Sequence” option under the Captions file menu.
- In the “Create Transcript” dialog box that appears, choose the audio track from the dropdown menu that corresponds to your video’s sound.
- Select your preferred transcription language.
- Check the “Only Inside In and Out points” box if you want to transcribe only the section between your In and Out points.
- If there are multiple speakers, you can specify them here.
4. Start Transcription
- Once you’ve configured these settings, click the “Create” button and allow Adobe Premiere to transcribe your video.
5. Review and Edit the Transcription
- Examine the transcribed text in the Captions tool.
- Double-click on any sections that require manual editing to adjust the captions as needed.
6. Create Captions
- When you’re satisfied with the transcription, click the “Create Captions” button at the top of the Captions panel.
7. Customize Caption Style
- In the ensuing pop-up box, ensure that “Create Captions from Transcription” is selected.
- Modify any other settings to suit your preferences.
- Click “Create,” and Adobe Premiere will insert your captions into the timeline.
8. Adjust Caption Style
- To change the appearance of your captions, select all the captions in the timeline.
- Access the “Essential Graphics” tab.
- In the “Effects Controls” panel, you can make alterations such as adjusting the font, weight, size, and style of the captions to match your desired visual style.
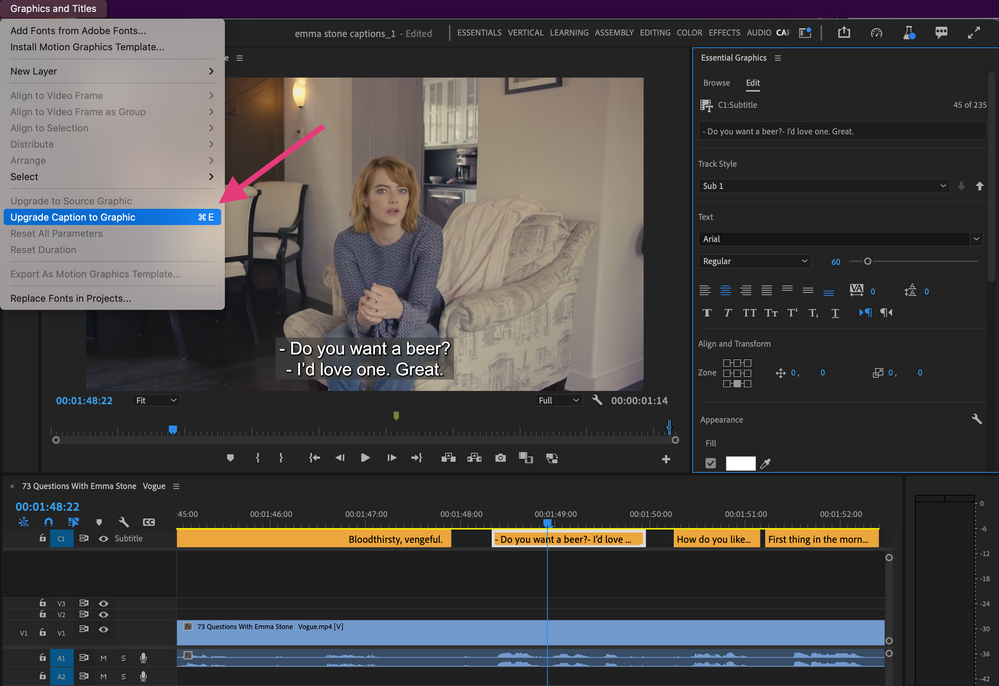
Upgrading Captions to Graphics
- Select Captions: Click on the caption clip or clips you want to upgrade to graphics to select them. You can select multiple caption clips by holding down the Shift key while clicking.
- Graphics and Titles Section: On top of the Effects Control Panel, look for the “Graphics and Titles” section. This is where you’ll find the option to upgrade captions to graphics.
- Upgrade Captions to Graphics: Within the “Graphics and Titles” section, you should see a button or link that says “Upgrade Caption to Graphic” or something similar. Click on this button.
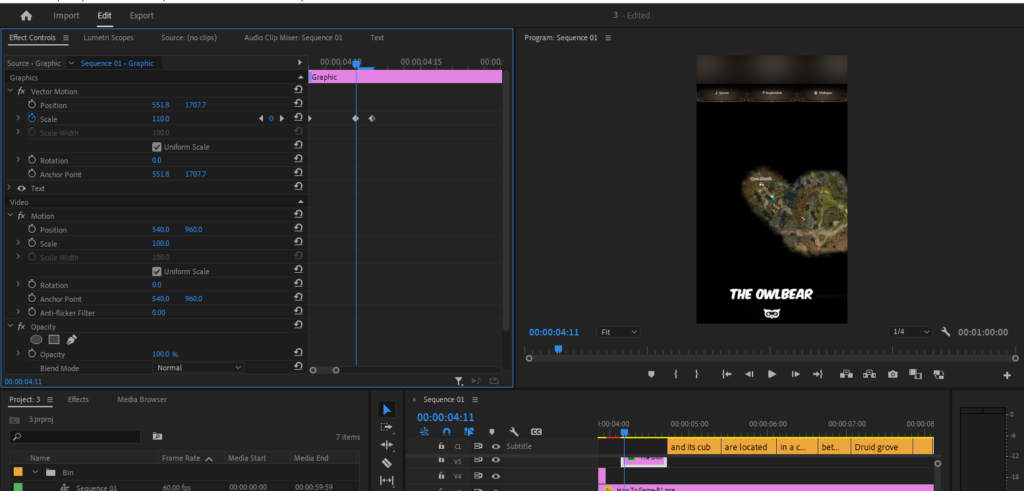
Pop Up Effect
- Select the Subtitle Graphic: In the timeline, select the subtitle graphic you want to apply the pop-up effect to.
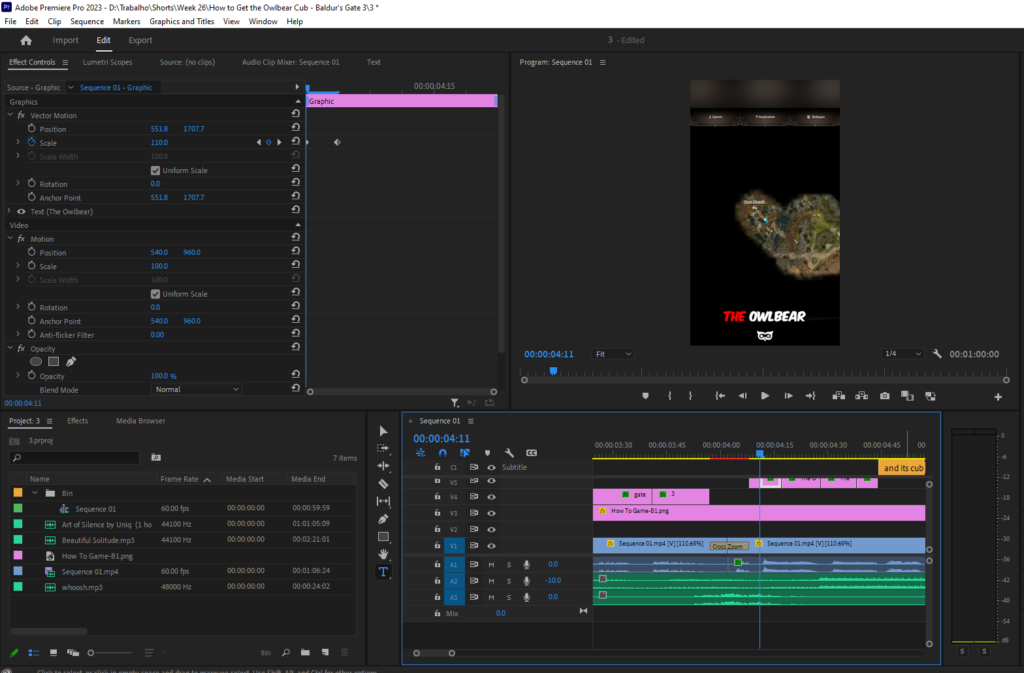
- Effect Controls Panel: Make sure the “Effect Controls” panel is visible. If it’s not, you can open it by navigating to the “Window” menu and selecting “Effect Controls.”
- Create the Initial Keyframe: Move the timeline crosshair (playhead) to the beginning of the subtitle graphic’s appearance on the timeline. In the “Effect Controls” panel, locate the “Scale” property and create a keyframe by clicking the stopwatch icon next to it. This sets the starting scale.
- Set the Initial Scale Value: With the initial keyframe in place, change the “Scale” value to 50%. This will make the subtitle graphic initially small.
- Move Forward 3 Keyframes: Advance the timeline crosshair three keyframes forward. You can use the right arrow key to do this quickly.
- Create the Second Keyframe: Create another keyframe for the “Scale” property by clicking the diamond icon next to it.
- Set the Second Scale Value: Change the “Scale” value to 110%. This will make the subtitle graphic larger after 3 keyframes.
- Move Forward 1 Keyframe: Advance the timeline crosshair one keyframe forward.
- Create the Third Keyframe: Create another keyframe for the “Scale” property.
- Set the Third Scale Value: Change the “Scale” value back to 100%. This sets the final scale value, making the subtitle return to its original size.
- Adjust the Anchor Point: In the “Effect Controls” panel, locate the “Anchor Point” property. Click on the value next to it and drag the anchor point to the middle of the text in your subtitle graphic. This will ensure that the text scales up from its center.
- Preview the Effect: Play back your video to preview the pop-up effect. Adjust the timing and scale values as needed to achieve the desired look and timing for the pop-up effect.
- Fine-Tune as Necessary: You can fine-tune the keyframes by selecting and dragging them on the timeline to adjust the timing of the pop-up effect.
- Add it to other Subtitles: You can copy the effect by right clicking the subtitle, press copy, then just select all the subtitles you want to add the effect to and right click again, press paste atributes, make sure that Scale Attribute Times is selected.
Karaoke Effect
- Subtitle Graphics: Ensure that your subtitles are already in graphic format, and they are placed in the timeline where you want the karaoke effect to appear.
- Effect Controls Panel: Make sure the “Effect Controls” panel is visible. If it’s not, you can open it by navigating to the “Window” menu and selecting “Effect Controls.”
- Create the Initial Keyframe for Crop: Select the first subtitle graphic in the timeline. In the “Effect Controls” panel, locate the “Crop” property. Create a keyframe by clicking the stopwatch icon next to it. This sets the initial crop position.
- Adjust the Crop for the First Word: Adjust the “Left” crop value to crop out all but the first word of the subtitle. You may need to also adjust the “Right” crop value to ensure that only the first word is visible.
- Change the Color of the First Word: You can change the color of the first word by applying a color effect to the subtitle graphic. To do this, go to the “Effects” panel, search for the “Color” effect, and drag it onto the subtitle graphic in the timeline.
- Animate the Crop for the First Word: Move forward in the timeline a few frames (the duration you want the first word to be visible) and create another keyframe for the “Crop” property.
- Reset the Crop Values: Reset the “Left” and “Right” crop values to 0, bringing the entire subtitle graphic back into view. This will reveal the first word.
- Change the Color for the Next Word: If the next word is in a different color, repeat step 6 to change the color of the second word. Apply the “Color” effect and adjust the color settings as needed.
- Animate the Crop for the Second Word: Move forward in the timeline again (the duration for the second word) and create another keyframe for the “Crop” property.
- Adjust the Crop for the Second Word: Adjust the “Left” crop value to crop out all but the first two words. Reset the “Right” crop value to 0.
- Repeat for Subsequent Words: Continue this process for each word in your subtitle. For each word, create a keyframe for the “Crop” property, reset the crop values to reveal the current word, and change the color if necessary.
- Preview and Adjust Timing: Play back your video to preview the karaoke effect. Adjust the timing of the keyframes to match the pace of the subtitles and the desired karaoke effect.
One Word at a Time Effect
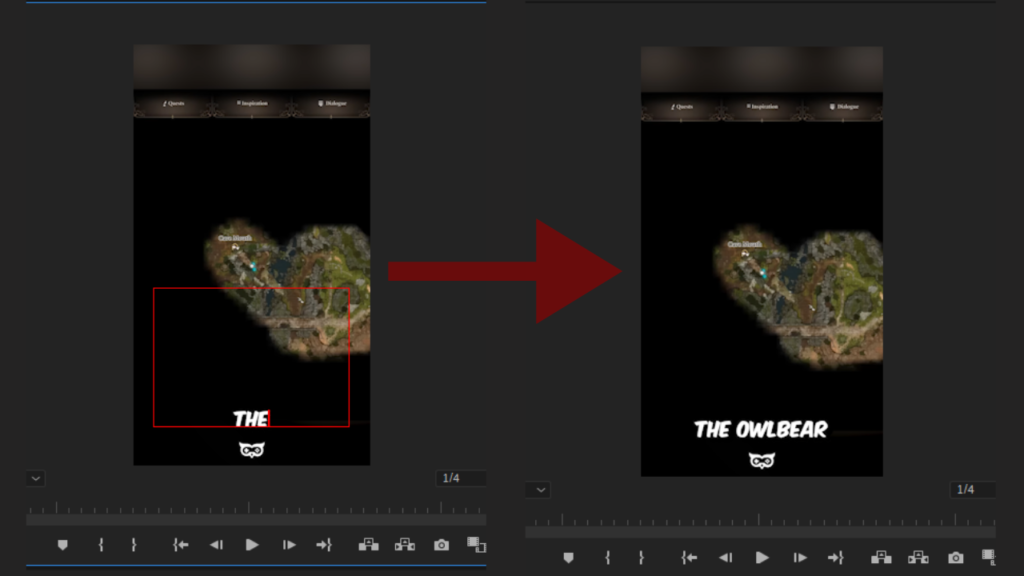
- Subtitle Graphics: Ensure that your subtitles are already in graphic format, and they are placed in the timeline where you want the effect to appear.
- Effect Controls Panel: Make sure the “Effect Controls” panel is visible. If it’s not, you can open it by navigating to the “Window” menu and selecting “Effect Controls.”
- Create the Initial Keyframe for Text: Select the first subtitle graphic in the timeline. In the “Effect Controls” panel, locate the “Text” property. Create a keyframe by clicking the stopwatch icon next to it. This sets the initial text.
- Edit the Text: With the initial keyframe in place, edit the text so that only the first word or phrase is visible, and the rest is deleted.
- Move Forward to the Next Subtitle Graphic: Move the timeline crosshair (playhead) forward to the point where you want the next subtitle graphic to appear.
- Create the Second Keyframe for Text: Create another keyframe for the “Text” property.
- Edit the Text for the Second Subtitle Graphic: Edit the text for the second subtitle graphic, adding the next word or phrase, and deleting the words that haven’t been spoken yet.
- Repeat for Subsequent Subtitle Graphics: Continue this process for each subtitle graphic, moving forward in time, creating keyframes for the “Text” property, and progressively editing the text so that only the desired words are visible for each subtitle graphic.
- Preview and Adjust Timing: Play back your video to preview the “One Word at a Time” effect. Adjust the timing of the keyframes to match the pace of the spoken words and the desired effect.
In conclusion, Adobe Premiere Pro offers a versatile set of tools to create captivating subtitle effects that can enhance the visual appeal of your videos. Whether you’re looking to add a pop-up effect, create a karaoke-style display, or reveal words one by one, Premiere Pro provides the flexibility to bring your creative vision to life. With the step-by-step guides provided, you can confidently navigate through the process of upgrading captions to graphics, crafting engaging pop-up subtitles, or achieving the “One Word at a Time” effect. Remember to fine-tune your effects, adjust timings, and experiment with various options to achieve the desired results. By mastering these subtitle effects, you’ll be able to elevate your video content, engage your audience, and convey your message with style. Adobe Premiere Pro empowers you to add that extra layer of visual storytelling to your projects, making them more impactful and memorable. Happy editing!


